Static IPs with NAT on Hyper-V
The goal is to have networking with static ip addresses for virtual machines on Hyper-V. The machine must also be able to access the internet. The easiest way is to start a Powershell session with elevated rights. Then use the follwing three commands. Feel free to change any names and ip address ranges.
- Create a new switch
New-VMSwitch -SwitchName "NAT Switch 192.168.40.x" -SwitchType Internal
- Assign and IP address
New-NetIPAddress -IPAddress 192.168.40.1 -PrefixLength 24 -InterfaceAlias "vEthernet (NAT Switch 192.168.40.x)"
- Enable NAT
New-NetNAT -Name "NATNetwork" -InternalIPInterfaceAddressPrefix 192.168.40.0/24
This will result in:
- a virtual network interface card (vEthernet) that has ip
192.168.40.1assigned to it. - a virtual network switch (NAT Switch 192.168.40.x) that can be connected to virtual machines
- Network Address Translation (NAT) between vEthernet and the hosts physical network connection.
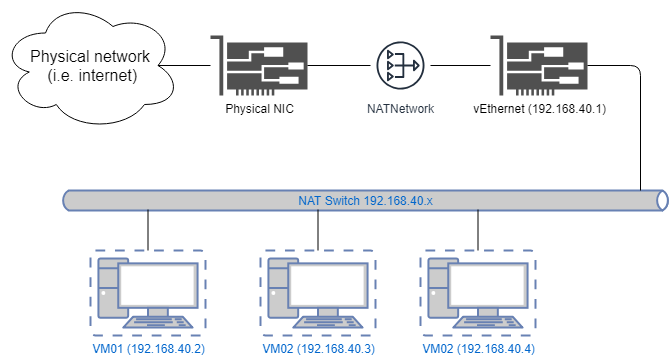
Be sure the configure networking on your virtual machines as follows:
Address: 192.168.40.<anything between 2 and 254>
Mask: 255.255.255.0
Gateway 192.168.40.1
That’s it!